
Over the years I have had a love/hate relationship with LED Tape! On one hand, I love how versatile and cost effective it is. However, I am sure we have all seen a few implementations that were less than impressive. I’ve seen many stage designs with wavy and sagging sections, lines that were at one time straight that over time became bows and LEDs that are fading because of poor soldering or lack of power distribution. This week on the Sunday Supply Blog I want to highlight a recent project we worked on for Lakepoint Family Church in Leamington Ontario and share 5 tips for executing LED tape designs well.
We were contacted by Drew Mercer, the Assistant Pastor over Music and Production at Lakepoint Family Church (https://www.lakepoint.church). They had been using the same stage/set design for a number of years and were looking to make something fresh. They had seen LED strips utilized in a number of other churches and needed some direction and insight for their upcoming build. We worked with their incredibly talented (I mean this sincerely) team of volunteers and staff to engineer, design and purchase the materials to create a fantastic new design. Below is a recap of the creative process we went through with Lakepoint and the 5 steps you should take to create a truly professional and long-lasting stage.
1 ) Understand Your Options & Components
The world of LED tape can be confusing if you have never used it before. There are acronyms and numbers that all mean something and the first step in building a professional grade LED design is understanding what all of this information means and what will work best for your stage design.
The Components
To make LED tape work requires the following. The LED tape itself, a decoder and a power supply.
1.1) LED Tape
LED Tape comes in a number of different formats and options.
What does SMD stand for?
The abbreviation SMD refers to a ‘Surface Mounted Device’. That means this is an LED Chip (device) mounted directly to a light strip, without using wires. This surface mounting technology is indeed what makes LED Light Strips possible. Take SMD 3528 for example, they are 3.5mm wide and 2.8mm long. Note that size is not proportional to output or performance, and it is not the only difference between LED chip types.
What does 2835, 3528 and 5050 mean?
The numbers after the SMD simply refer to the physical size of the LED Chip. SMD 3528 Chips are perhaps the most common of all LED light strip chips. They are the least bright and least power intensive. 2835 chips offer the same brightness of 3528 chips but with greatly improved efficiency and lifespan. These chips are typically only one colour and ARE NOT what you are looking for. SMD 5050 Chips are 5.0mm x 5.0mm. 5050 chips are typically 3 times as bright as 3528 chips, they also have 3 diodes per chip. Red, Blue and Green.
What do RGB and RBGW mean?
The 4 letters in RGBW stand for Red, Blue, Green, and White (You will find options for Amber also). If you know anything about colour you know that all colours are created from the three primary colours. That is how RGB can be used to create millions of different colours. When it comes to LED tape, there are options to have additional LEDs that are set to a specific white temperature. It is important to note that this extra white can produce brighter colours and a more true white, but the actual diode is separate from the other RGB chip. This is important to consider if your tape will be visible to the audience because every other diode will not have colour.
What does density mean?
Simply put the density of the LED tape is the number of diodes per meter of tape. Low density tape has 30 LEDs/meter, medium density tape has 60 LEDs/meter and high density tape has 120 LEDs/meter. The most common options available for purchase are either 30 (low) or 60 (medium) density tape.
What does the IP rating mean? (IP68, IP67)
These specifications have nothing to do with the LEDs themselves but are the waterproof specifications for the tape.
PRO TIP: Unless you are making a set design that will be used outdoors, don’t use waterproof tape, it makes the tape far more difficult to work with, doesn’t stick as well and sags more easily.
White/Black?
You can get LED Tape on a white or black backing. Keep in mind that the LED chips and components will not be black or white necessarily.
Summary/Recommendation
Our recommendation is to use RGB SMD5050 tape with a density of 60 diodes/meter. This product is bright, has a nice density between diodes, looks great on camera, doesn’t have alternating white pixels and will serve you well. We recommend getting tape on a black backing so it hides in the background better.
1.2) Decoder
Every project we do with LED tape we feel like we come across different systems for controlling LED tape, but for today we are going to focus on the four types of decoders we have used broken down to 2 different categories, Basic and Pro. These are all viable ways to control your RGB SMD5050 Tape.
IR Receiver Decoder (Basic)

All over the internet you will find simple IR remotes that easily plug into your LED tape. These are a quick and simple solution for running and operating your LED tape. This is a great solution for setups that don’t require frequent changes to the lighting. Often the power supply for the LED tape is included with the decoder and simply plugs in.
WIFI/Bluetooth Decoder (Basic)
Much like IR you can get very cheap decoder that work with apps for your phone that are often free. This solution could work great for smaller venues and kids/youth spaces. Often the power supply for the LED tape is included with the decoder and simply plugs in.
DMX (Pro)

DMX cdecoders allow you to plug your LED strips into a DMX universe with your other lights. Different DMX decoders will use a different number of channels depending on the features it supports. It could be as few as 3 channels for the red, blue and green. We have worked with decoders that use up to 12 channels and have options for fade, chase, strobe etc. You need to research and pick a decoder that will work with your DMX universe(s) and controller. You will need a computer or control surface to speak to the controller via DMX. If you are green and want to learn the basics of DMX, we found this great video on YouTube. Using these DMX decoders usually requires some understanding of electronics as the power supply will need to be wired in to the controller.
Art-Net (Pro, Beyond Pro)
If you are using pixel tape, first of all we applaud you, this is not an easy undertaking. Because each LED on the strip has its own address standard DMX can’t handle the sheer amount of channels required. You would need to use art-net to run this. This in all honesty is above my pay grade. I understand the principles of how it works, but you would be better served by learning from guys like the guys at Sparkfun. Check out this tutorial here. https://learn.sparkfun.com/tutorials/using-artnet-dmx-and-the-esp32-to-drive-pixels/all. If you do end up using pixel tape let us know, we would love to learn from you!
1.3) Power Supplies
There are a wide variety of options for powering your LED tape. As said in the Controllers section, basic controllers have a simple plug that you can just plug a basic power supply (usually 12v) into. If your venue is larger and/or you are controlling your LED tape with DMX you will have to do some math to account for how much draw your LED tape will have and how frequently you will need to inject power so that you don’t have fading or dimming further down the strip. Jump to section 4 about wiring well to learn more.
PRO TIP: You can use a single 12v computer power supply to power multiple strips. Most manufacturers will specify the draw of the LED tape/meter. You can use this formula (watt / volt = amp) to find out how many LEDs can be run from a single power supply.
2 ) Plan Well
So you know you want to make an LED tape set. If you are anything like me you have already spent a significant amount of time on Amazon or AliExpress sourcing out LED materials. But wait! Before clicking that “checkout” button lets do the right thing and do some much needed planning. The best way to plan out any stage design project is to take a photo of your existing stage and start sketching out design ideas on top of the image.
I usually open the image in Photoshop, but you can simply play with the exposure and contrast in whatever software you are comfortable with to make it washed out and print physical copies. Check out this quick video on using “Preview” to do this on your Mac. This will allow you to play around with ideas and start to dream about what the finished product will look like. This is the photo that Drew sent me with measurements of key elements on in the design, like the height and width of the screens, the distance from the floor to the bottom of the screens etc.

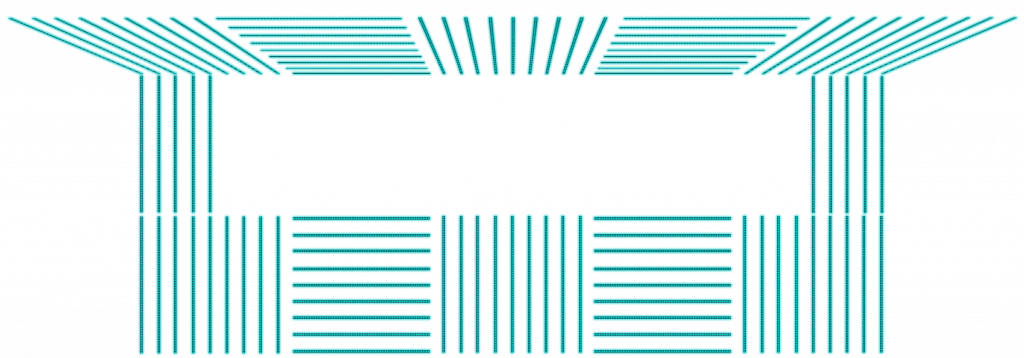
I took this image into Photoshop and was able to start applying some of the different design cues that Drew and the team were looking for. They wanted it to be lines or a repeating pattern. They sent me a picture of a Hillsong United design they liked and it really worked well with their space. From the floor to the bottom of the screen was 8’. So I created perpendicular alternating groups of lines that were grouped together in squares. Strips in this mockup are spaced out 8” from one another.
They also wanted to join their current three screen setup into a single screen using three edge blended projectors. As I am writing this blog, I am inspired to share some insights I have about building a killer ultra wide screen that perfectly fits your venue. Keep an eye on our blog and social media for a post on building a custom, strong, lightweight wooden frame frame and where to purchase screen material by the role for cheap.

Mocking up a visual like this is crucial for a number of reasons. Before building, to see that we wanted more of a gap between the strips to make it less intense. Here is a mockup of the wall with 12” gaps between strips.
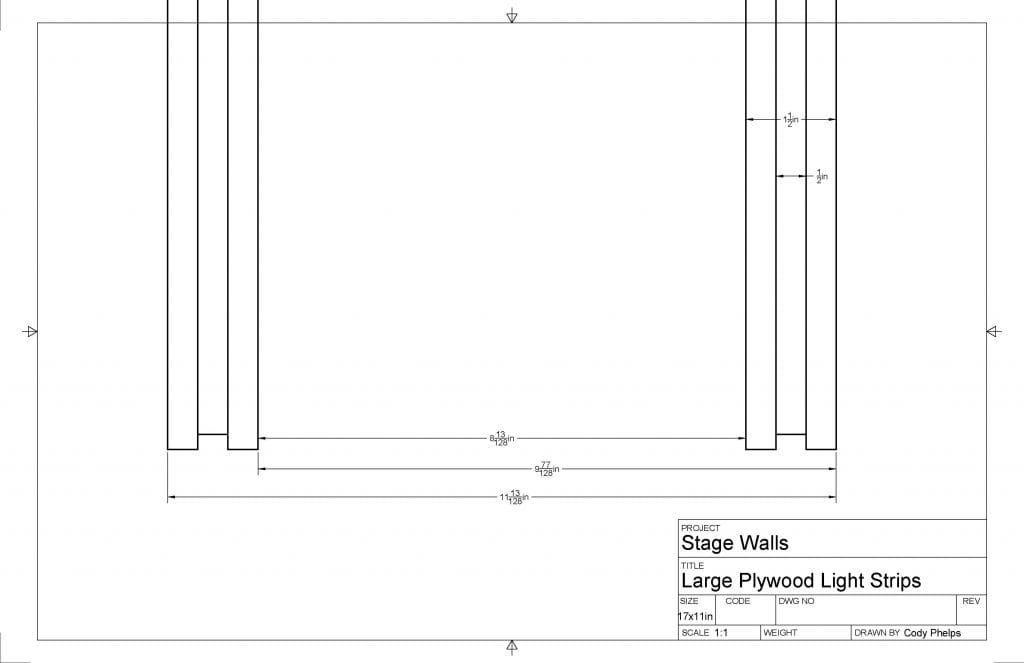
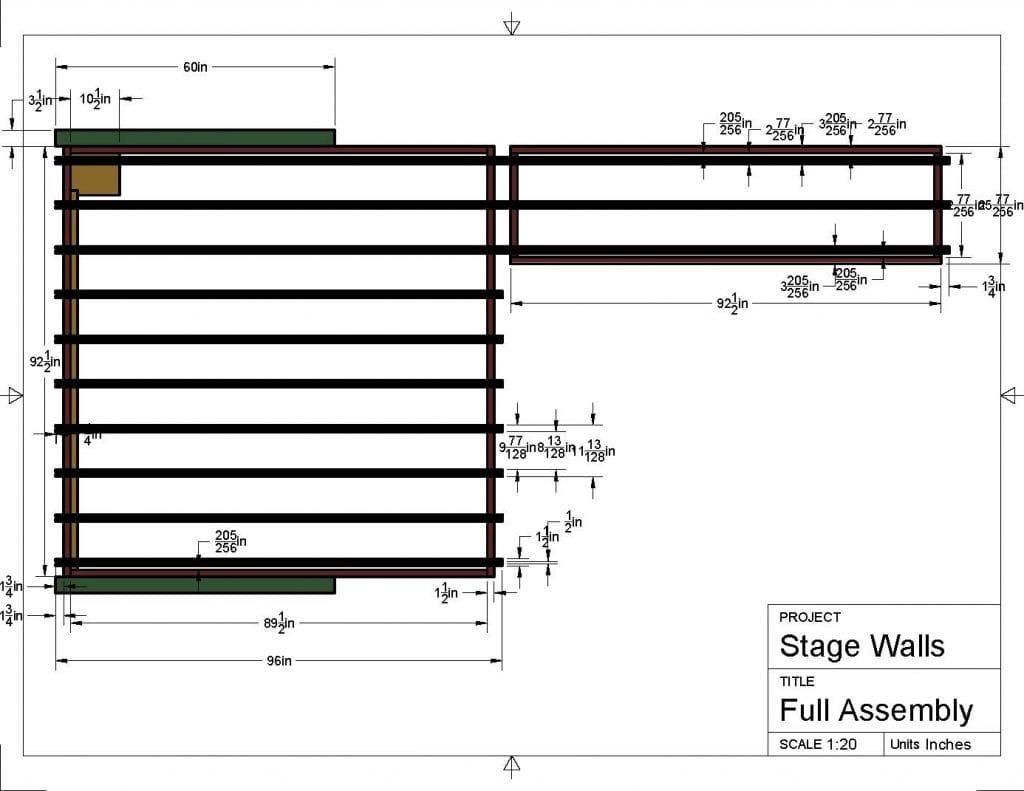
The planning on this project was taken to the next level because Lakepoint has a volunteer, Kody Phelps who is proficient in Skethup and was able to make some models and technical diagrams for the building specifications I sent the team. This is by no means required but it makes a huge impact on the project when you can plan out the build to this degree.

Because we had done this degree of planning, we knew exactly what to expect but more importantly how much material we needed to execute the design. I can’t stress enough the importance of the design phase. As you can see, there was a considerable amount of time spent considering all of the details and how the end product will look and function. It was also decided on during the design phase was that we wanted each of the strips to be controlled independent of one another. Considering the function and control of the LED strips is an important thing to consider during the design phase because it impacts what you need to purchase.
3) Purchase Well
Now that the designing is complete the next stage is to purchase the materials. Seems simple right!? Yes, there are a number of online stores that sell what you need to execute. Take your time with this process! Create a spreadsheet, compare prices, shop around. We have had a great deal of success with https://www.aliexpress.com. Look at the comments sections and reviews not he products you are considering buying, this tells you what you need to know about the quality of product and customer service when things dont work as they should. Consider all of the components needed to complete the job. What glue to do you need? What screws do you need? What paint will you use? There are so many things to consider when putting together a budget for a project like this. Your leadership will appreciate that you have considered all of the miscellaneous costs associated with your new stage build. Moreover, your volunteers will appreciate that you respect their time and won’t leave them stranded because you need to run to the hardware store to get more wood!
Purchase Extra and Expect the Unexpected
When I do a project like this I always add 10% more materials than needed. This makes room for end cuts and goods that may arrive on site dead (DOA). Better to have what you need and return the extra then be stuck without the stuff you need to get the job done. Additionally, I always add another 5% of the total budget as “unforeseen expenses” just to make sure that leadership is aware of possible minor expenses that will be required to complete the project.
4) Construct Well
This might seem obvious, but LED tape by itself is flimsy. Even when you are putting it on a hard surface there are a number of things that should be considered to produce a truly professional product.
4.1) Make a rigid substrate
One of my biggest pet peeves with LED tape sets is when the lines aren’t straight. To deal with this I suggest making a wooden backing for every… yes… EVERY strip that is cut to length. I suggest using plywood because it will bend and bow the least over time. The design that I gave to Lakepoint had them cut 8’ (that was the length of their strips everywhere, but it can be any length) by 1.5” strips of plywood. Then I had them datto (cut a trench in the wood) that was 1/4” deep the length of the board. (see next pro tip) They were then painted black and the strips were glued into the trench. Why you ask? This will forever keep the tape straight and true, and the datto trench is just another way to keep things secure and laser straight.
PRO TIP: The 1/4” trench was actually too deep for this application and it made some of the strips hidden when viewed from a sever angle. I would suggest a mod to this design and make the trench just 1/8” or even 1/16” deep.
4.2) Make a solid substructure
Now that you have laser straight individual strips, it is important to create a substructure that will support the individual strips and keep them spaced evenly. Our design with Lakepoint had them make a simple wooden square with blocks at each end for joining sections. They also had to put some structure in the ceiling to support the ceiling sections.
4.3) Consider all of the components
In the top left hand corner of the blueprint below you will notice a small square of plywood. This is to hold the DMX decoder. It is simple little design features that will make your design clean, sturdy and professional.
5) Wire & Power Well
The final step in making your new LED Tape stage design stand out against the rest is properly considering and calculating the power that you need. If you are using basic decoders that use wifi or IR remotes, I strongly suggest that you use one decoder per section of LED tape up to 5m in length. You can join sections with connectors but in our experience at around the 6 or 7 meter mark you will start to have a noticeable drop in the brightness of each LED thereafter.
5.1) If at all possible DO NOT SOLDER
Maybe I feel this way because I am not the worlds greatest solder..er (is that an actual word?). But I have come to find that the components (diodes, capacitors, chips etc.) in LED tape are incredibly sensitive. I have had problems over the years with LED tape acting funny and LEDs having their colour go funny after soldering. Furthermore, there are connectors and adapters available online that should enable you to install your LED tape with little to no soldering. A simple search on AliExpress here shows a crazy array of connectors, T joints, L joints etc. We strongly recommend taking advantage of these resources. Just be mindful that if you are using the RGB SMD5050 Tape like we suggest you need 4 wire connectors.
5.2) Install enough power points
As we mentioned above, you will see a noticeable drop in the brightness of your LEDs around the 7 meter mark. We suggest doing smaller sections up to 5 meters and having a new power point. These can feed off a single power supply (if it can support it) but shouldn’t feed off another LED strip (like a daisy chain).
5.3) Make sure your power supply has enough amps
First of all, always check your LED tape to see what voltage it requires! Most will require 12v. But as I just said, you can power many 12v strips off of a single power supply if it can support it. For our project with Lakepoint, we wanted a separate decoder and power supply for each section of 8 strips. Here is the math I used to figure out how many amps I needed in each power supply knowing that the draw of our LED tape was 8 watts/m (this is the figure provided in the specifications section by the LED tape manufacturer)

- 8watts / 12 volts = 0.667 amps
- Therefore our draw is 0.667 amps/m
Figure out the total length of LED tape used in each section
- Each strip of tape is 8ft Long
- 8ft = 2.44m (3.28 ft/m)
- 8 Stips at 2.44m is a total of 19.52m of tape
Calculate the amps required to drive each section
- 19.52m x 0.667 amps = 13.02
- Therefore each of our decoders will need to be powered with at least a 14amp power supply at 12 volts.
In recap, to find the draw of your LED tape.
- Find the how many watts/m your LED tape draws
- Use the w/v=a equation to find the amp draw of your LED tape/m
- Find the length of your strips in meters
- Multiply your total length in meters by the amps per meter.
5.3 Hide and pin down wires well
Finally, pin back any wires and manage wiring and cabling well. Not only does this make for a much prettier product, it will inevitably stop things from getting broken. If things are taped down and secure there is less change of someone getting caught on the wires while moving or even waking by the strips.
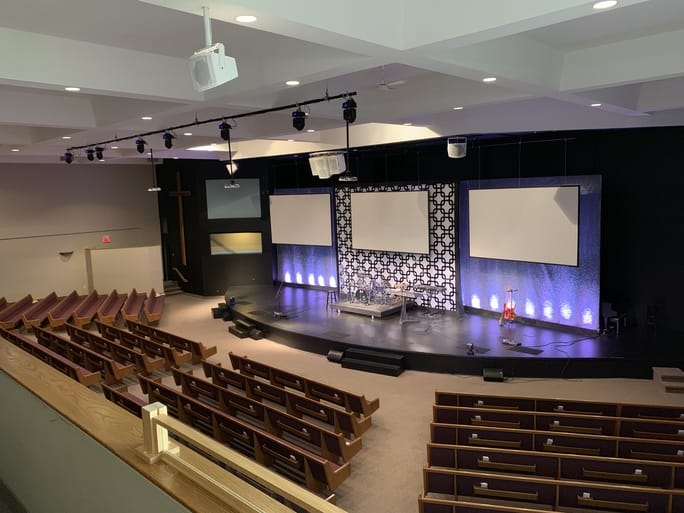
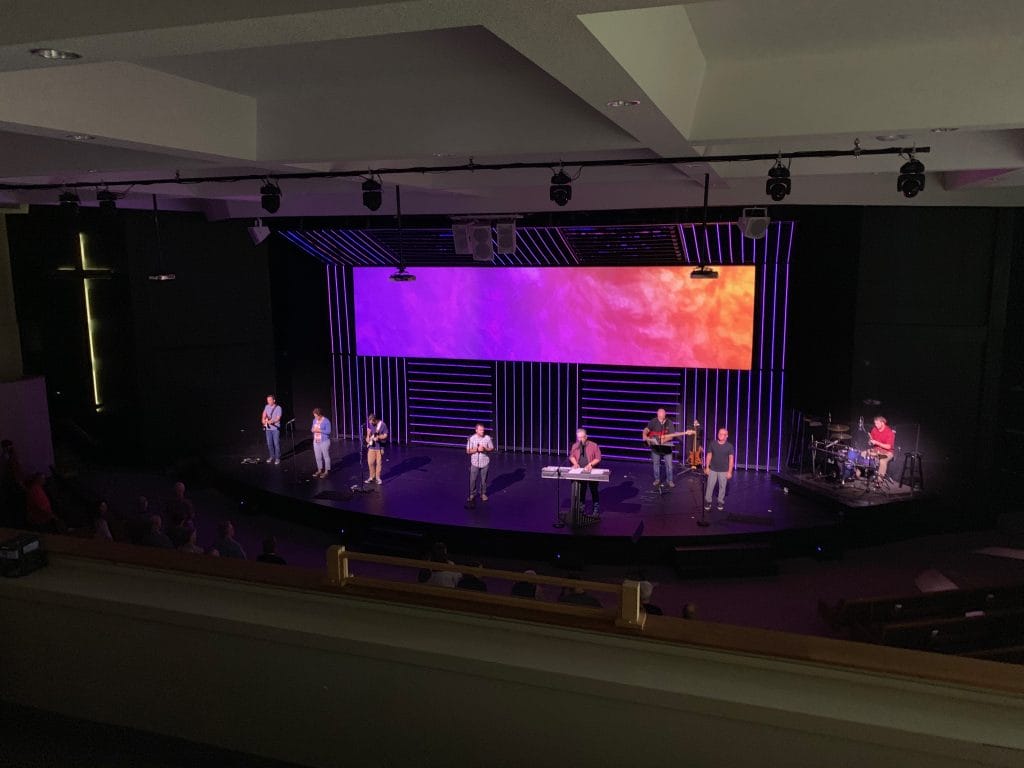
Okay, okay… I’m sure by now you want to see the finished product! A huge shout out to Drew Mercer and his team. We were 100% hands off on the actual construction of this design. We think they did an incredible job executing the plan.


I hope you found this post helpful. It isn’t all encompassing by any means, but it is a great primer to get you started in creating a new professional level LED tape stage design. If you have found this helpful leave a comment of message/tag us on Facebook and Instagram. Also, if there is anything we can do to help you achieve the results you want to achieve with your stage, feel free to give us a call, we would love to help!